This is part of my deck construction series in which I work through the starting cards in each Specialty and Background. I don’t discuss Reward cards or get too deep into synergies between Specialties and Backgrounds. I don’t want these to get too complex and lengthy, but at the bottom I do offer some deck combinations for you to look over for ideas and inspiration. I may expand these posts in time to include more discussion of the different possible combinations.
Deck Construction Series
-
Artisan Deck Construction in EBR
-
Shepherd Deck Construction in EBR
-
Forager Deck Construction in EBR
-
Traveler Deck Construction in EBR
-
Explorer Deck Construction in EBR
- What makes a Shaper unique?
- Conduits
- Roles
- Manifestations
- Strengths and Weaknesses
- Aspect Considerations
- Deck Starting Points
- Conclusion
What makes a Shaper unique?
Shapers are the equivalent of the magic users in the world of Earthborne Rangers and as such sit to the side of the other specialties. Most of their cards are Manifestations and can only be played by a Ranger with an equipped Conduit. And, you guessed it, only Shapers can equip Conduits. Their magic is more connected with intention and manipulation of natural elements, but not in a dramatic fireballs and tidal waves sort of way.
Conduits & Manifestations
There are four conduits, one for each high aspect, and they are unique in a few ways. They have the Setup keyword, which allows you to start with it in play. This is probably the case because Conduits are essential to play Manifestations, but there are some hidden benefits. Starting with it in play means you only really need 1 in your deck, so as you work through the campaign you can freely swap out the second copy for something else.
Conduits collect tokens and you use them to either power the exhaust ability or to play manifestations. As a shaper, you’re trying to set up a side economy of tokens on your Conduit. Later we’ll get into the pros and cons for each of the conduits.
Shaper Roles
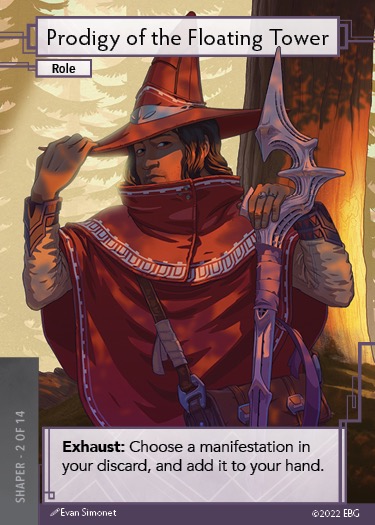
There are two roles: The Adherent of the First Ideal and the Prodigy of the Floating Tower. The exhaust ability of both roles is pretty good. Let’s take the Adherent first. Being able to scout a challenge card is very helpful. I cannot state how awesome it is to know at least one challenge card a turn. You can choose what test to perform knowing the modifiers waiting for you. You can clear or exhaust a card with a challenge effect that would trigger. If you really don’t like it, you can put it on the bottom of the deck. It has such a profound effect on creating a good flow and navigating a cluttered or tricky tableau of path cards.

The Prodigy allows you to choose a manifestation from your discard and add it to your hand giving you much more flexibility and utility out of those cards. You can commit a manifestation for the approach icons, draw it back into your hand, and then play it in the same turn. Nice flexibility, but I do think there are ways to get cards out of your discard already, although not directly into your hands. So this is unique in that sense, but it is restricted to manifestations.
Conduits
The best way to get into deck building considerations for the shaper is to look at the conduits because that will determine your high aspect and the main thrust of that deck’s playstyle.
I distinguish between the Conduits as low or high volume, which means the number of tokens you can expect to place on these, which in turn affects the number of manifestations you can play or exhaust abilities you can use.
Also, in general the Exhaust ability enhances the common test associated with that Aspect (Stave of the Sun is an exception). In EBR, exhausting for an effect is generally superior to testing for the effect because Tests require you to draw a challenge card (with its modifiers and any challenge effects it might trigger) and Tests can result in Fatigue.
Stave of the Sun
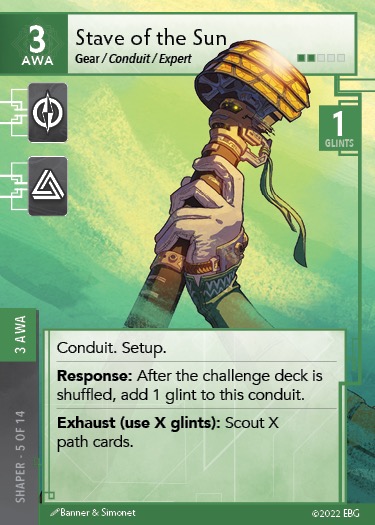
You add a token when the challenge deck is shuffled and the exhaust ability is to scout X path cards for X tokens.
This is a low-volume Conduit because only 4 of the 24 cards in the challenge deck have a reshuffle icon. You cannot use this Conduit and expect to play a lot of manifestations so be selective with the manifestations you include. This does give you a bit more freedom with your deck progression through the campaign. You can bring in more diversity from Rewards or Gear/Moments without compromising your deck.
The Exhaust ability doesn’t connect with your AWA Common test (which is to Avoid) but Scouting Path cards is tied to other AWA cards (Eagle Eye, Riri the Sparrow Hawk). Unlike those, however, the Stave of the Sun doesn’t require you to draw a Path card and add to the tableau. This can be really helpful if you just want to peek at what’s coming. But don’t expect to do this a lot because you cannot count on having a lot of tokens on this card.
My recommendation is to save the tokens you need for the manifestations you plan to play, then use the Exhaust ability in key moments where know what is coming would make a difference for you. This Conduit matches well with the Adherent role since you won’t be playing a ton of manifestations anyway and have little use to pull them back from your discard with the Prodigy.
Staff of the Wanderer
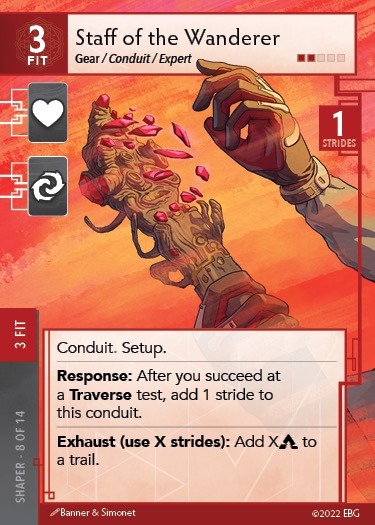
You gain strides on this card when you succeed at a traverse test and you can exhaust the card to add X Progress to a Trail card.
This Conduit is a little higher volume than the Stave of the Sun and adding tokens is more in your control since Traversing is an often-used Common test. With 3 FIT you are likely to be doing more of it and succeeding when you do.
More tokens means using the exhaust ability more. The trouble is that that it’s kind of duplicative of the Traverse test, which you are already good at, and not every feature is a Trail. The other way this is a weaker exhaust is that it overlaps a bit with a strong Shaper Manifestation: Shape the Earth, which you are likely to have in your deck.
The better way to plan to use your tokens is through playing more Manifestations and is therefore a good match with the Prodigy of the Floating Tower so you can get even more use out of them.
Rod of the Clouds
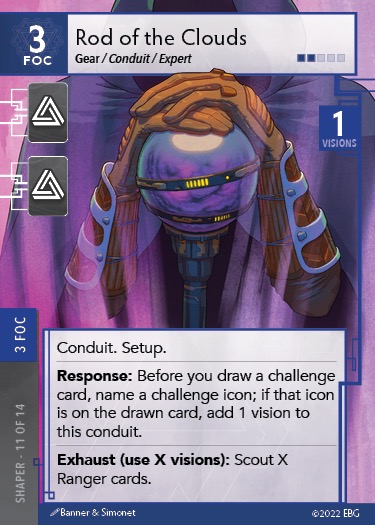
Moving to the Focus conduit: Rod of the Clouds. You add Visions when you successfully name the challenge icon before you draw a challenge card. The exhaust ability is to scout X cards of your Ranger deck.
This is also a high volume conduit if you pair it with Adherent of the First Ideal because scouting the challenge deck guarantees at least one vision per turn. If you use novice lens and save Focus, you’re potentially getting two Visions guaranteed per turn and that’s really going to add up.
The exhaust ability is pretty standard except that you don’t have to draw a card and you don’t have to trigger a test. With the common Remember test you do, and that actually is a drawback in my experience because you don’t want to draw down your deck and shorten your day. Rod of the Clouds allows you just to look and control what you will draw next. In many cases, you won’t care about drawing more cards but you will want to know what’s coming next in your deck, so that makes this ability fairly useful, especially because with the high volume of visions you can use it pretty liberally.
The combo of Rod of the Clouds + Adherent of the First Ideal + Novice lens is pretty intriguing. That combination allows you to control two of the three decks in play and scouting path cards is actually fairly easy to incorporate through your Background, outside interest, or deck progression.
One drawback to Rod of the Clouds is that FOC is the least useful energy because of the common test (especially so because of your exhaust ability). So you will need a turn to turn plan of how you will use all that FOC energy. Novice Lens a great addition because you can basically consider that you are spending one FOC a turn to scout a challenge card. But finding ways to use the remaining FOC will really help your deck feel efficient and strong.
Scepter of Harmony
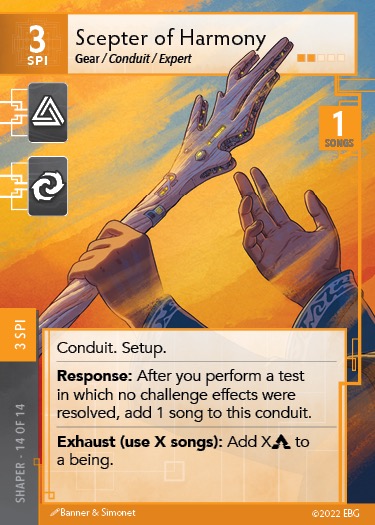
Continuing with the Scepter of Harmony, the fourth and last conduit. This is another high volume Conduit. You add Songs when a challenge icon triggers no effects and your exhaust is to place X progress on a being.
You will be adding Songs quite a bit earlier in the day before the tableau builds up and if you are able to clear cards efficiently. This gives you a nice bank of tokens to work off of and plan around.
The exhaust ability is good. It’s really satisfying and really helpful to dump a bunch of progress on to a being and clear it. Some of the predators can have a really high progress threshold that would take you several turns to reach with Connect tests.
The Scepter synergize as well with the Prodigy, because of the ability to recall and play lots of manifestations. Scouting the challenge deck isn’t as important as maximizing your use of manifestations.
Roles
Onto Roles, which I’ve written a lot about already so we can move a bit more quickly through them.
Prodigy of the Floating Tower is for a high manifestation build. Otherwise, what’s the point? There’s not much reason to pair it with Stave of the Sun as the lowest volume conduit. Rod of the Clouds benefits tremendously from the Adherent so you’d be foolish to use the Prodigy instead. The most obvious synergy is with the Scepter of Harmony.
All in all, I would say Adherent of the First Ideal is the better of the two roles because of power and uniqueness of the ability to scout the challenge deck.
Manifestations
The Great
Let’s start with the heavy hitters, the really strong Manifestations.
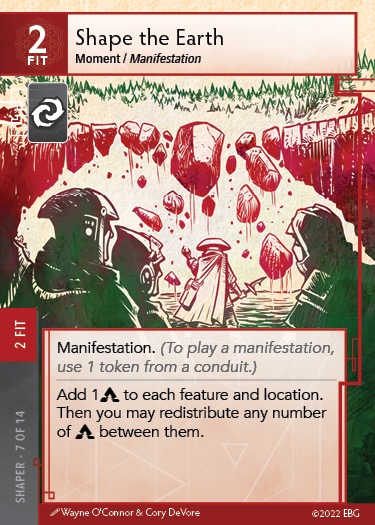
Shape the Earth is a great way to clear a cluttered board and place progress wherever you want without Fatigue or a Test. If you have lots of features you can add four or five progress across all the features in the location and then distribute them as you need either to clear features, obstacles, the location itself.
It is fairly expensive at 2 FIT and a 1 FIT aspect Ranger, who most needs the help, can’t use it. But nonetheless, it’s a really, really nice card.
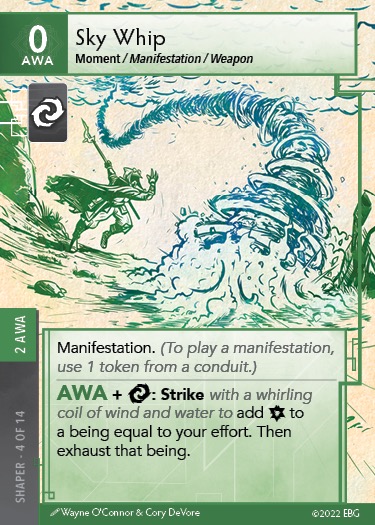
Sky Whip is also a great card and it’s the only weapon in the Shaper specialty. You can add quite a bit of harm to a being, up to 4 or 5 if you have enough Approach icons, which is enough to clear most predators. Also, there is no negative consequence for failing like many other weapons. In fact, you still get to exhaust the being as long as you succeed, and success is easy. This Test only has a threshold of 1, so instead of only placing harm, think of Sky Whip as a cheap avoid with the possibility of lots of harm. Normally with avoid you have to reach the presence of the being but here you do not AND you can place harm on it.
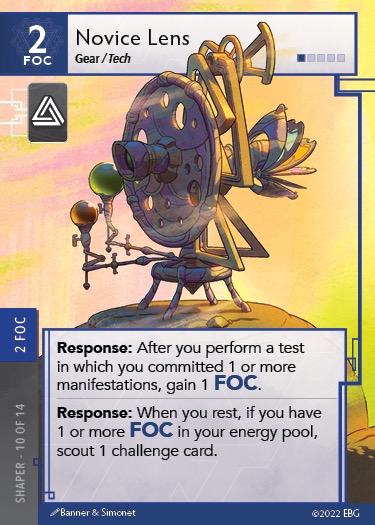
Novice Lens is not a manifestation so this is the one card that other specialties can take as an outside interest. Scouting the Challenge deck is awesome, so that ability itself makes this card worth considering. The other Response is less useful because with a minimum of 2 FOC in your build already you probably don’t need more FOC energy every turn.
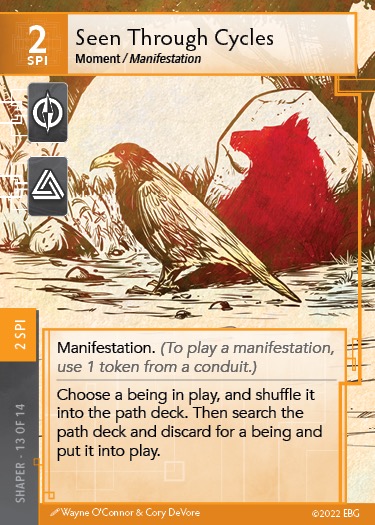
Seen Through Cycles is another strong card. Not only can you find a being and put it in play, you can remove a nasty one back in the deck. You might not need 2 in your deck unless you are running a high manifestation build. The approach icons aren’t bad so it’s valuable as a commit card as well.
The Good
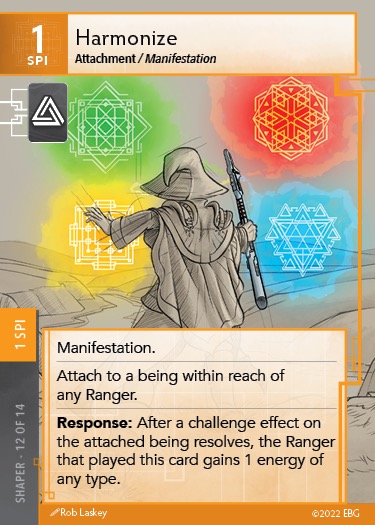
Harmonize is in the next tier down as it is more situational. You want to attach it to a being you aren’t planning to clear quickly, like a friendly being or Ranger with a Helping Hand mission. If you find the right match this card can be a semi-reliable energy battery for you. This doesn’t really have a place in a low-volume deck because paying 1 token is a pretty steep cost.
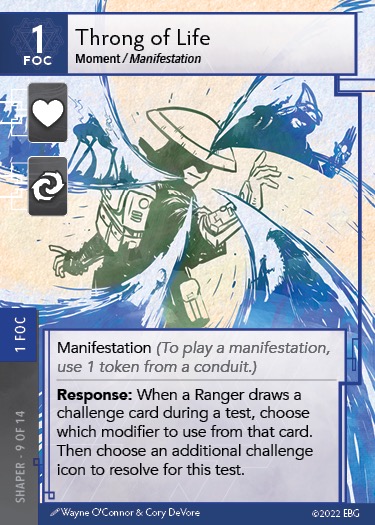
Throng of Life is a pretty useful utility card that can boost any test you want to perform. It can be a great way to succeed at a test in your lowest aspect, especially paired with Adherent so you can see the challenge card coming.
Having to choose an additional icon isn’t all that bad because a lot of times there’s one an icon that won’t trigger anything in play, and sometimes there’s an icon you want to trigger. If you have the Scepter of Harmony, choosing an icon that won’t trigger actually helps you!
The OK
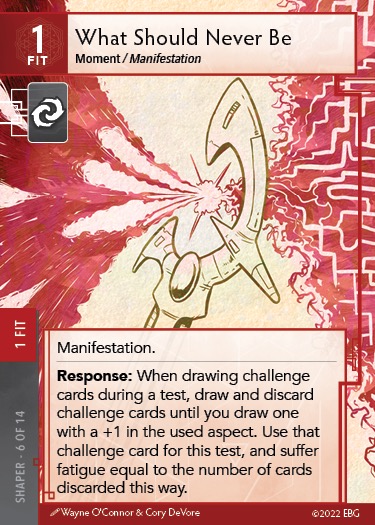
What Should Never Be is definitely a meh card. If you don’t have a way of soothing fatigue, you are really exposing yourself to a lot of fatigue. Even if you can, you’re shortening your day by taking all that fatigue.
The only situation I see this being effective is when you don’t care about fatigue, like near the end of the day, and you need to guarantee success on a critical test. Since you know you will get a +1 modifier, you can guarantee success.
Root Snare is another marginal and situational card. You can throw it on some harmless little flora that you never intend to clear and make it into a dodge battery. But it is limited by only allowing you to dodge an equivalent number of cards to the progress you remove, and if you have too many progress you might clear the feature it’s attached to and lose the card. If you could dodge everything in the area, I’d say this is a great card. As it is, it’s a back pocket card. It’s cheap and maybe helpful in a pinch but keep no more than 1 in your deck.
I should mention that there are two Shaper attachments: Root Snare and Harmonize. There isn’t a way to bring attachments into your deck through the in-game effects. So if you want to include them you should put it in at the beginning. It’s easy enough to swap them out later for a reward card.
Strengths and Weaknesses
Beginning with the strengths, the roles have really strong abilities that synergize well within the specialty, headlined by the Adherent’s ability to scout the Challenge Deck. It has a great weapon – Sky Whip – with a dual effect of dealing harm and exhausting the being with no threshold, as opposed to Avoid tests. The exhaust ability of the Conduits are fairly powerful without forcing you to perform a test and draw a challenge card.
Another important benefit of Conduits is the Setup keyword. You get to start with it in play, which means that you don’t need to run two in your deck because you rarely need to draw it. The only situation would be if you somehow lost and had to reshuffle your gear or if you chose to start with a different Setup card. However, 95% of the time you’ll have your Conduit in play. This gives you a deck slot free for another gear, reward card, or whatever you want.
Shapers are weak in several ways, starting with having no way to soothe fatigue so you will need to find that in your background. Also, outside the Conduits you only have one other gear option. That does free you up to pull more in from your Background or Reward cards, so this isn’t a full on weakness.
The last, but certainly not least, weakness is that a lot of the manifestations are pretty situational so with higher volume conduits you may end up with a lot of tokens and not much to do with them. They are also mostly Moments, which are one shot cards unless you can recur them from your discard. As a Shaper, you need to lean into having a diverse set of Manifestations (from the starting cards and Reward cards) to give you the right option when you need it. In most cases, you don’t need to have 2 copies of every moment in your deck.
Aspect Considerations
Any of the Conduits are viable to construct a deck around, so I think you could choose any energy to be your 3 stat. For your lowest stat, you probably want to choose either FOC or SPI simply because Sky Whip and Shape the Earth are such strong cards and require 2 in their energies. And with the choice between SPI and FOC for a low stat, I would lean towards making FOC your lowest. Connect is a more useful Common test than Remember and Seen Through Cycles + Throng of Life (2 SPI and 1 FOC requirements) is a stronger option that Novice Lens + Harmonize (the reverse).
Deck Starting Points
- Shepherd – Shaper : A Shaper’s Best Friends (Stave of the Sun)
- Artisan – Shaper : Superfit Shaper (Staff of the Wanderer)
- Traveler – Shaper : Itinerant Monk (Rod of the Clouds)
- Forager – Shaper : Pacifist Gardener (Scepter of Harmony)
Conclusion
Shapers are a lot of fun, and a bit more challenging to play because of the alternate economy of your conduits and manifestations. Navigating that, as well as strategically progressing your deck towards a diverse set of options, can result in a longer learning curve and slower developing deck. But when it finally clicks and you hit the right number of Manifestations to your Conduit’s volume of tokens, playing as a Shaper can be fun, challenging, and rewarding!

Leave a comment